Setting up
Overview
Teaching: min
Exercises: minQuestions
How do we setup our environment
Objectives
Install an SSH and VNC client
Check your Supercomputing Wales account is working
Connect to Supercomputing Wales via SSH
Install Software
Check you have an SSH and VNC client installed. See the Setup page for more details.
Test SSH
ssh a.<aber user id>@vnc.sunbird.swansea.ac.uk
Quick overview of Supercomputing Wales
Parts of a High Performance Computing System
- Login nodes
- Compute nodes
- Storage
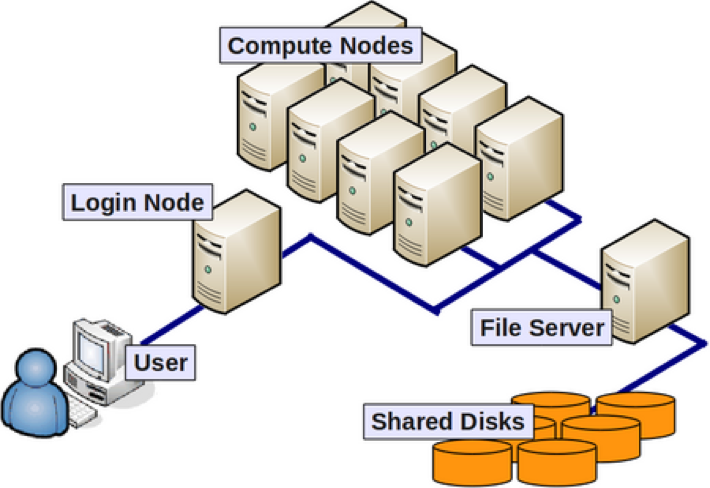
Swansea Sunbird System
| Partition | Number of Nodes | Cores per node | RAM | Other |
|---|---|---|---|---|
| Compute | 122 | 40 | 382GB | |
| GPU | 4 | 40 | 382GB | 2x Nvidia V100 (5120 core, 16GB RAM) |
800TB scratch drive and 200TB home directory. Neither are backed up.
Key Points
Running IDL programs
Overview
Teaching: 10 min
Exercises: 0 minQuestions
How do we run IDL programs on the command line?
Objectives
Launch the IDL command line interface on a login node.
Launch the IDL command line interface on a compute node.
Loading software modules
As there can be multiple versions of software installed on SCW a system of loadable modules let you choose which version to have. IDL versions 8.4 and 8.7 are both installed. Version 8.4 is a copy licensed to Aberystwyth and can only be run by certain Aberystwyth users. 8.7 is licensed to SCW and anybody can use it.
Listing available modules
module avail
or
module av
This will produce a long list of available software modules.
IDL is found in the /apps/local/modules/languages section near the bottom of this list.
----------------------------------------------------------------------------------- /apps/local/modules/languages ------------------------------------------------------------------------------------
anaconda/2019.03       IDL/8.7                java/13                matlab/R2019b          perl/5.30.0            python/3.7.2-gnu-4.8.5
IDL/8.4                java/11                matlab/R2019a          octave/5.1.0           python/2.7.16-gnu-8.1  python/3.7.2-gnu-8.1
Loading the module
We can load the default version (8.7) of IDL by running:
module load IDL
Or we can explicitly specify a version by doing:
module load IDL/8.7
Seeing which modules are loaded
The module list command shows which modules are loaded:
$ module list
Currently Loaded Modulefiles:
  1) null      2) IDL/8.7
Unloading modules
A single module can be unloaded with the module unload command or all modules can be unloaded with the module purge command.
$ module unload IDL
$ module list
Currently Loaded Modulefiles:
  1) null
Running IDL
The standard command line version of IDL can be launched with the idl command (after loading the module).
$ module load IDL
$ idl
IDL 8.7.2 (linux x86_64 m64).
(c) 2019, Harris Geospatial Solutions, Inc.

Licensed for use by: University of Swansea
License: MNT-5515312
IDL>
This has only launched on the login node and this should only be used for very quick and simple testing.
Now lets allocate a node using the salloc command.
$ salloc -n1 -t 0:10:0 --partition=development
salloc: Granted job allocation 188375
salloc: Waiting for resource configuration
salloc: Nodes scs0121 are ready for job
$ ssh scs0121
Last login: Fri Mar 29 11:18:51 2019 from sl1
[a.abc1@scs0121 ~]$ module load IDL
[a.abc1@scs0121 ~]$ idl
IDL 8.7.2 (linux x86_64 m64).
(c) 2019, Harris Geospatial Solutions, Inc.

Licensed for use by: University of Swansea
License: MNT-5515312
IDL>
.
.
Do some work here
.
.
IDL> exit

[a.abc1@scs0121 ~]$ exit
logout
Connection to scs0121 closed.
$ exit
exit
salloc: Relinquishing job allocation 188375
$
Key Points
IDL must be loaded through a module
We should run computationally intensive things on a compute node, not a login node.
Where possible we should wrap things into batch jobs that can run without user intervention.
Using VNC
Overview
Teaching: 10 min
Exercises: 0 minQuestions
How do we use graphical applications on Supercomputing Wales?
Objectives
Start your own VNC server
Connect to a VNC server using an SSH tunnel
VNC
Running a VNC server
We can start a VNC server by logging into vnc.sunbird.swansea.ac.uk and running the program vncserver. The first time you do this you’ll be prompted to create a password for you VNC server, this is different to your normal SCW password. Only the first eight characters of this password will be saved and the method for saving it isn’t secure, so don’t reuse a password from elsewhere.
$ ssh a.abc1@vnc.sunbird.swansea.ac.uk
[a.abc1@sl3 ~]$ vncserver

You will require a password to access your desktops.

Password:
Verify:
Would you like to enter a view-only password (y/n)? n
A view-only password is not used

New 'sl3:4 (a.abc1)' desktop is sl3:4

Starting applications specified in /home/a.abc1/.vnc/xstartup
Log file is /home/a.abc1/.vnc/sl3:4.log
We’ve launched a new VNC server and its server number 4. Keep note of this number, you’ll need it again in a minute.
Opening an SSH tunnel
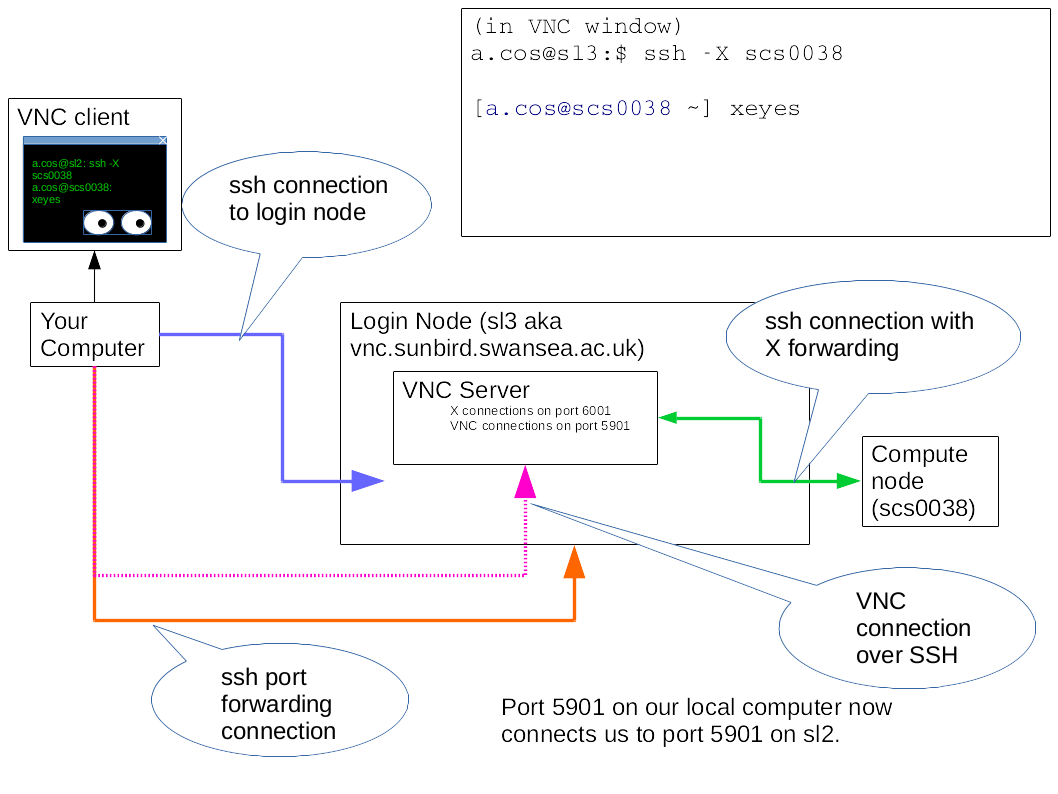
VNC is now listening on port 5900 + our server number, so in this example we have server number 4 and the port number is 5904. Unfortunately the firewall configuration blocks incoming requests on these ports, we have to use an SSH tunnel to access it. An SSH tunnel puts all the data from a remote server through an SSH connection and then re-presents it on a different port on our local system. If we run:
ssh a.abc1@vnc.sunbird.swansea.ac.uk -L 5901:localhost:5904
It will map port 5901 on the local system to port 5904 on Sunbird. Our VNC client can now connect to port 5901 on the local system and it will actually get access to port 5904 on Sunbird.
When connecting a helpful message will be displayed telling you about your VNC session(s) and reminding you of the command to connect:
TigerVNC server sessions:

X DISPLAY #     PROCESS ID
:4              142658
Your VNCServer port is set to 5904
Connect with a tunnel using ssh:  ssh -L 5900:localhost:5904 a.abc1@vnc.sunbird.swansea.ac.uk
You can also list the running VNC servers with the command vncserver --list.
### VNC clients with built in port fowarding
Launching a VNC client
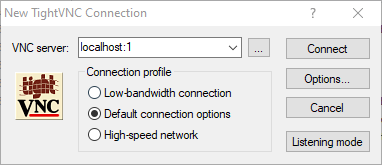
Run a VNC viewer and connect to localhost port 1 or 5901. If you have a command line VNC client use:
vncviewer localhost:1
Or if you are running a graphical client then enter localhost in the hostname box and 1 or 5901 in the port number.
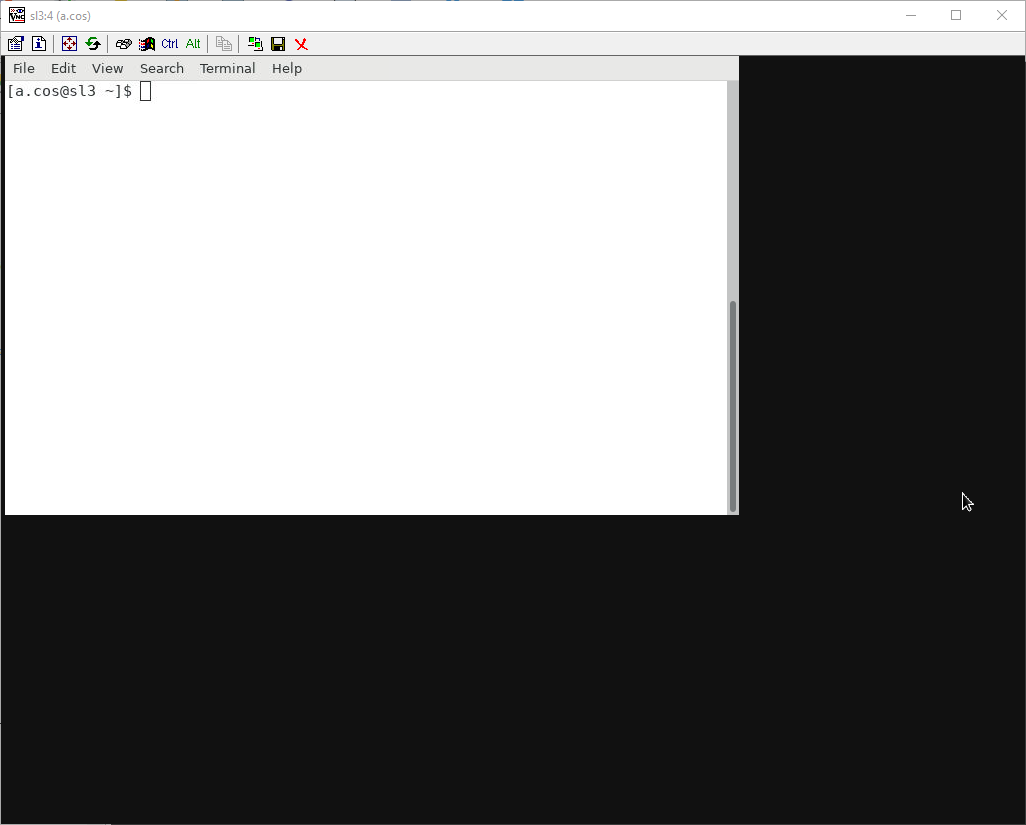
VNC only launches a terminal with no window controls or has a black screen
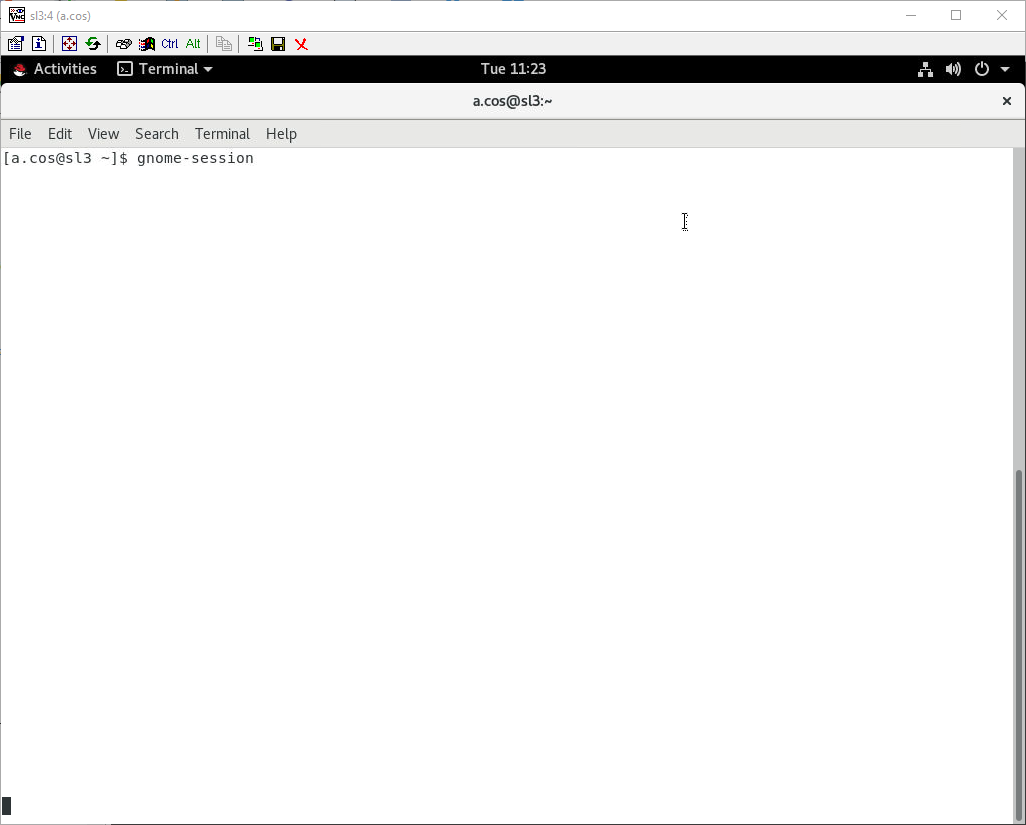
Depending on the contents of your .vnc/xstartup file VNC might start without a window manager. This might cause either a black screen or just a terminal with a white background and no window controls. To fix this type the following into your SSH session, replacing :4 with the number of your VNC server.
export DISPLAY=:4
xterm &
A white terminal should now appear in the VNC session, in this now type gnome-session and some menus and window controls will appear.
Connecting to a graphical application on a compute node
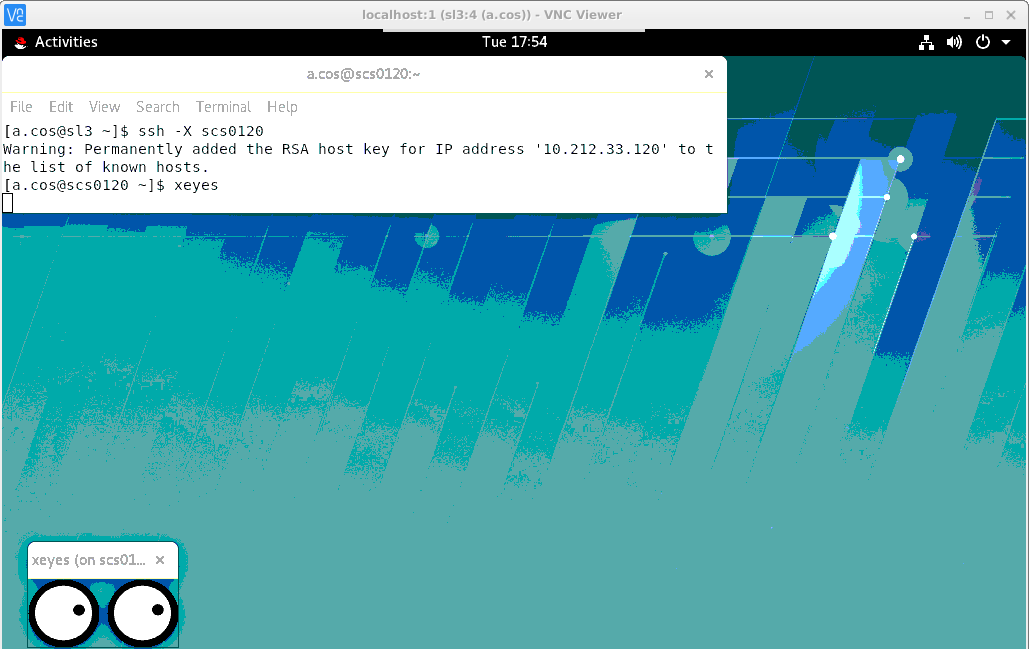
So far we’ve got a VNC server running on the login node, but any computational software should run on a compute node. To do this we first need to get an allocation on a compute node by running salloc -n1 -t 1:00:00 (Which will allocate 1 CPU core with a 1 hour time limit) and then login with X Windows display forwarding by using the SSH command with the -X option. We can test this by running the command xeyes, this should bring up a window with two eyes that follow the mouse pointer. The window title should say “xeyes (on scs0XXX)” (where XXX is a number between 001 and 126).
[a.abc1@sl3 ~]$ salloc -n1 -t 1:00:00
salloc: Granted job allocation 188111
salloc: Waiting for resource configuration
salloc: Nodes scs0120 are ready for job

[a.abc1@sl3 ~]$ ssh -X scs0120
[a.abc1@scs0120 ~]
Ending an interactive session
After running an interactive session be sure to do the following:
- Logout of the compute node by typing exit
- End the job allocation by typing exit again or using the scancel command.
An overview of how all this fits together
Key Points
VNC lets us see the graphical output from a remote system.
To connect to VNC on Sunbird we need to use an SSH tunnel due to firewall restrictions.
The VNC server needs to be started from an SSH session.
Programs using the VNC session will keep running when we disconnect.
A Solarsoft IDL example
Overview
Teaching: min
Exercises: minQuestions
How do we run IDL programs using the Solarsoft library
Objectives
Run an IDL program using the Solarsoft library
A simple set of example code to confirm that IDL and Solarsoft are functioning as expected is available from https://gitlab.com/FaradaysGnomes/scw-idl-tutorial.git.
Setting up the code
Download this project into your home directory:
git clone https://gitlab.com/FaradaysGnomes/scw-idl-tutorial.git
Change into the directory:
cd scw-idl-tutorial
Edit the set_sunbird.pro directories to point at our work directories. For this tutorial we will just point it at the scw-idl-tutorial folder.
nano set_sunbird.pro
Change the home and idlhome lines to the following and then use CTRL+X to exit, pressing y when asked to save and then hitting enter to confirm the file name.
home='/home/'+username+'/scw-idl-tutorial
idlhome=home
Running the Example on the Login Node
Load the IDL module:
module load IDL
Launch idl on the command line and then type set_sunbird, ['sdo'] to run the Solarsoft configuration script.
$ idl
IDL 8.7.2 (linux x86_64 m64).
(c) 2019, Harris Geospatial Solutions, Inc.

Licensed for use by: University of Swansea
License: MNT-5515312
IDL> set_sunbird, ['sdo']
% Compiled module: SET_SUNBIRD.
% Compiled module: DEVICELIB.
% DEVICELIB: Added system variable !BCOLOR
% DEVICELIB: Added system variable !ASPECT
% Compiled module: IMAGELIB.
% IMAGELIB: Added system variable !IMAGE
IDL>
SSWIDL should now be configured. We can test this by using the example procedure:
IDL> tutorialshowvsoimage, '/home/a.abc1/'
% Compiled module: TUTORIALSHOWVSOIMAGE.
% Compiled module: DOWNLOADVSO.
% Compiled module: VSO_SEARCH.
% Compiled module: VSO__DEFINE.
% Compiled module: SOAP__DEFINE.
% Compiled module: GEN__DEFINE.
% Compiled module: VSO_SERVER.
% Compiled module: IS_STRING.
% Compiled module: HAVE_NETWORK.
% Compiled module: URL_FIX.
% Compiled module: IS_BLANK.
% Compiled module: HAS_URL_SCHEME.
% Compiled module: URL_PARSE.
% Compiled module: STR_REPLACE.
% Compiled module: IS_NUMBER.
% Compiled module: IS_STRUCT.
% Compiled module: SINCE_VERSION.
% Compiled module: SOCK_HEAD.
% Compiled module: IS_URL.
% Compiled module: IS_FTP.
% Compiled module: IDLNETURL2__DEFINE.
% Loaded DLM: URL.
% Compiled module: HTTP_PROXY.
% Compiled module: IS_NUMBER2.
% Compiled module: SOCK_IDL_AGENT.
% Compiled module: USE_PROXY.
% Compiled module: HAVE_PROXY.
% Compiled module: SOCK_CONTENT.
% Compiled module: SOCK_CONTENT_HTTP.
% Compiled module: BYTE2STR.
% Compiled module: MERGE_STRUCT.
% Compiled module: HTTP__DEFINE.
% Compiled module: ALLOW_SOCKETS.
% Compiled module: OS_FAMILY.
% Compiled module: HAVE_TAG.
% Compiled module: TRIM.
% Compiled module: GREP.
% Compiled module: APPEND_ARR.
% Compiled module: EXIST.
% Compiled module: OBJ_STRUCT.
% Compiled module: XMLPARSER__DEFINE.
% Compiled module: VSO_FORMAT.
% Compiled module: ANYTIM2UTC.
% Compiled module: DATATYPE.
% Compiled module: STR2UTC.
% Compiled module: VALID_NUM.
% Compiled module: DELVARX.
% Compiled module: DELVARX2.
% Compiled module: DESTROY.
% Compiled module: BOOST_ARRAY.
% Compiled module: UTC2INT.
% Compiled module: TAG_EXIST.
% Compiled module: DATE2MJD.
% Compiled module: CHECK_INT_TIME.
% Compiled module: GET_LEAP_SEC.
% Compiled module: INT2UTC.
% Compiled module: MJD2DATE.
% Compiled module: STR_FORMAT.
% Compiled module: ARR2STR.
% Compiled module: TRIM2.
% Compiled module: TRY_NETWORK.
% Compiled module: STRARRCOMPRESS.
% Compiled module: SOCK_READU.
% Compiled module: IS_SOCKET.
% Compiled module: CLOSE_LUN.
% Compiled module: XKILL.
% Compiled module: STACK__DEFINE.
Records Returned : JSOC : 1/1
Found   1 files. Downloading first file...
% Compiled module: VSO_GET.
% Compiled module: UNIQ.
% Compiled module: DEFAULT.
% Loaded DLM: XML.
% VSO_GET: This will download 1 file(s)
1 : http://netdrms01.nispdc.nso.edu/cgi-bin/netdrms/drms_export.cgi?series=hmi__Ic_45s;compress=rice;record=15210242-15210242
% Compiled module: SOCK_COPY.
% Compiled module: REM_DUP_KEYWORDS.
% Compiled module: SOCK_GET.
% Compiled module: CURDIR.
% Compiled module: IS_MEMBER.
% Compiled module: DATA_CHK.
% Compiled module: TEST_DIR.
% Compiled module: WRITE_DIR.
% Compiled module: CHKLOG.
% Compiled module: GET_DELIM.
% Compiled module: FIX_SLASH.
% Compiled module: STR2ARR.
% Compiled module: DERIV_ARR.
% Compiled module: LOCAL_NAME.
% Compiled module: CONCAT_DIR.
% Compiled module: GET_LOGENV.
% Compiled module: VALID_TIME.
% Compiled module: GET_TEMP_DIR.
% Compiled module: HOME_DIR.
% Compiled module: SESSION_ID.
% Compiled module: GET_RID.
% Compiled module: NINT.
% Compiled module: MPRINT.
% Compiled module: GET_CALLER.
% Compiled module: STRPAD.
% SOCK_GET_MAIN: 15808320 bytes of hmi.ic_45s.2014.09.10_00_01_30_TAI.continuum.fits copied in 23.56 seconds.
% Compiled module: CHMOD.
% VSO_GET: Downloading completed
Done!
% Compiled module: READ_SDO.
% Compiled module: FILE_EXIST.
% Compiled module: FILE_STAT.
% Compiled module: GET_FITS_NEXTEND.
% Compiled module: FITS_OPEN.
% Compiled module: SXPAR.
% Compiled module: GETTOK.
% Compiled module: SXDELPAR.
% Compiled module: FITS_INFO.
% Compiled module: STRN.
% Compiled module: REQUIRED_TAGS.
% Compiled module: MREADFITS_TILECOMP.
% Compiled module: MREADFITS_HEADER.
% Compiled module: HEADFITS.
% Compiled module: FXPOSIT.
% Compiled module: FXMOVE.
% Compiled module: MRD_HREAD.
% Compiled module: FXPAR.
% Compiled module: MRD_SKIP.
% Compiled module: FITSHEAD2STRUCT.
% Compiled module: FXADDPAR.
% Compiled module: FXPARPOS.
% Compiled module: FMT_TAG.
% Compiled module: DETABIFY.
% Compiled module: STRSPECIAL.
% Compiled module: STRLASTCHAR.
% Compiled module: SSW_STRSPLIT.
% Compiled module: ID_ESC.
% Compiled module: ISVALID.
% Compiled module: ID_ESC_INIT.
% Compiled module: SSW_UNIQ.
% Compiled module: ID_UNESC.
% Compiled module: MRD_STRUCT.
% Compiled module: TAG_INDEX.
% Compiled module: STRMIDS.
% Compiled module: GT_TAGVAL.
% Compiled module: STR_TAGVAL.
% Compiled module: SSW_BIN_PATH.
% Compiled module: STR_SUBSET.
% Compiled module: WHERE_ARR.
% Compiled module: REP_TAG_NAME.
% Compiled module: STRUP.
% Compiled module: GET_TAG_INDEX.
% Compiled module: REM_TAG.
% Compiled module: ADD_TAG.
% Compiled module: IDL_RELEASE.
% Compiled module: LAST_ITEM.
% Compiled module: JOIN_STRUCT.
% Compiled module: BOX_MESSAGE.
% Compiled module: STRJUSTIFY.
% Compiled module: PRSTR.
 -----------------------------
| Uncompressing to> /usr/tmp/ |
 -----------------------------
% Compiled module: SSW_JSOC_INDEX2FILENAMES.
% Compiled module: TIME2FILE.
% Compiled module: ANYTIM.
% Compiled module: CHECKVAR.
% Compiled module: STR_LASTPOS.
% Compiled module: UTIME2STR.
% Compiled module: GETUTBASE.
% Compiled module: GETUT.
% Compiled module: INT2EX.
% Compiled module: DAYCNV.
% Compiled module: EX2INT.
% Compiled module: JDCNV.
% Compiled module: UTC2STR.
% Compiled module: MK_DIR.
% Compiled module: IS_DIR.
 --------------------------------------------------------------------------------------------------------
| /home/a.cos/hmi.ic_45s.2014.09.10_00_01_30_TAI.continuum.fits -> /usr/tmp/HMI20140910_000036_6173.fits |
 --------------------------------------------------------------------------------------------------------
% Compiled module: SSW_FILE_DELETE.
% FREE_LUN: Unable to delete file. Unit: 100, File: /usr/tmp/HMI20140910_000036_6173.fits
  Operation not permitted
% SSW_FILE_DELETE: Can't delete: /usr/tmp/HMI20140910_000036_6173.fits

FITSIO status = 105: couldn't create the named file
failed to create new file (already exists?):
/usr/tmp/HMI20140910_000036_6173.fits
% Compiled module: ALL_VALS.
% Compiled module: MREADFITS_SHM.
% Compiled module: FILE_SIZE.
% Compiled module: WHERE_PATTERN.
% Compiled module: LAST_NELEM.
% Compiled module: ALPHAGEN.
% Compiled module: IS_LENDIAN.
% Compiled module: GET_NBYTES.
% Compiled module: SWAP_ENDIAN_INPLACE.
% Compiled module: RELTIME.
% Compiled module: UT_TIME.
% Compiled module: UT_DIFF.
% Compiled module: SYSTIM.
% Compiled module: INT2SEC.
% Compiled module: ANYTIM2INTS.
% Compiled module: TIMSTR2EX.
% Compiled module: FMT_TIM.
% Compiled module: GT_DAY.
% Compiled module: GT_TIME.
% Compiled module: ATIME.
% Compiled module: FCHECK.
% Compiled module: F_ATIME.
% Compiled module: WC_WHERE.
% Compiled module: TIMEGRID.
% Compiled module: CONCAT_STRUCT.
% Compiled module: INT2SECARR.
% Compiled module: UPDATE_HISTORY.
% Compiled module: STR2NUMBER.
% Compiled module: BOOST_TAG.
% Compiled module: REP_TAG_VALUE.
% Compiled module: COPY_VAR.
% Compiled module: COMP_FITS_CEN.
% Loaded DLM: PNG.
Saved image to /home/a.abc1/
IDL>
This should have created two files in the home directory, one called hmi.ic_45s.2014.09.10_00_01_30_TAI.continuum.fits and the other output.png.
Copy the output back to your own computer
Open an SFTP or SCP client such as filezilla and connect to sunbird.swansea.ac.uk. Copy the output.png file back to your own computer and view it.
Alternatively this can be done from the command line (change a.abc1 to your user id) with the SCP command. The first part of the command specifies the username and hostname, the second part after the : is the name of the file we want to copy and the 3rd part is the destination for the file, in this case . means the current directory.
scp a.abc1@sunbird.swansea.ac.uk:output.png .
Automating the whole process
Launch nano and create a new file called run.pro
nano run.pro
Enter the two commands we typed above followed by exit
set_sunbird, ['sdo']
tutorialshowvsoimage, '/home/a.cos/'
exit
Now create a Slurm script to run this on a compute node:
nano testjob.slurm
and enter the code below, this will tell Slurm the job name is “testjob”, allocate 1 CPU core and give a time limit of 5 minutes. It then loads the IDL module and runs the run.pro script.
#!/bin/bash --login
#SBATCH --job-name=testjob
#SBATCH -n 1
#SBATCH --time=0-0:5:0

module load IDL/8.7
idl run.pro
Now submit the slurm script using the sbatch command.
sbatch testjob.slurm
Key Points
Use a slurm batch job to run your code on a compute node
Copy data back to your own computer with an SCP or SFTP such as Filezilla